Solar Car Project
|
|
|
|
|
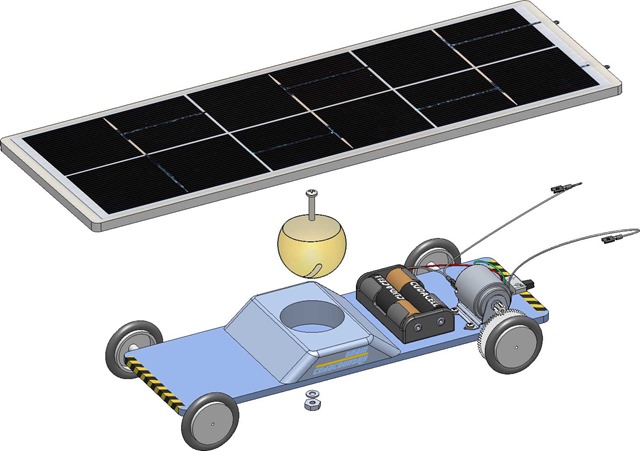
Basic steps to build a solar car
1. Choose chassis material and theme for car
2. Cut and shape chassis material
3. Cut axles – Sand edges until smooth
4. Cut bearings
5. Choose gear ratio
6. Attach bearings, gear and wheels to back axle.
7. Attach bearings and wheels to front axle.
8. Attach axle system to chassis
9. Attach gear to motor
10. Attach motor to car so gears are properly meshing
11. Design movable area for solar panel
12. Attach hook for guide wire
13. Decorate car

General Rules
The Ray Catcher Sprint Kit sold by PITCO and the Junior Solar Sprint kit sold by Solar Made are the solar panel/motor kits that are recommended, but not required, to be used in the competition. Solar panels cannot be shaved, drilled, or delaminated. Only the motor supplied in the kit can be used. Motors cannot be re-wound or disassembled. If an evaluation group convened by the event coordinator determines that the solar panel and/or motor have been modified, the car and team will be disqualified from the competition. Click here for more information on obtaining model solar car kits.
The remainder of the vehicle can be innovative in design and materials.
One solar panel and one motor are allowed per car. Reflectors, supports, and power leads can be added to these components as needed. Energy-enhancing devices, like mirrors, must be firmly attached to the vehicle.
The vehicle must be structurally sound, without the solar panel attached. The solar panel cannot be used as the chassis or body of the car. The axles and wheels cannot be directly attached to the solar panel. The solar panel cannot be a structural member of the car, but it must be attached to the car.
A student-designed attachment device must be attached to the car to accommodate a guide wire. A guide wire such as fishing line will be no more than 1.5 cm from the surface of the track. It will go through the eyelet attached to the car and serve as a steering mechanism to keep the car in its lane. The vehicle must be easily removed from the guide wire, without disconnecting the guide wire. This is the only allowable method of steering the car. No radio control is permitted in the car. Lane changing or lane crossing will result in a Did Not Finish (DNF) standing. A car whose race is impacted by an out of control vehicle will be allowed an opportunity to run the race again. A car that lacks steering control and interferes with other cars in other lanes will not be allowed to race again.
The model car must not exceed the following dimensions: 30 cm (11 ¾ inches) wide by 60 cm (23 5/8 inches) long by 30 cm (11 ¾ inches) high (as measured from the surface the car is resting upon to the highest point of the car will all its components attached) and positioned as during the time trials and races.
Students are encouraged to decorate the body of the car.
The sun’s light is the only energy source that can be used to power the vehicle. Batteries, capacitors, flywheels, or any other energy storage device are prohibited.
If the sun’s energy is judged insufficient by the event coordinator, a battery pack and two, AA 1.5 V batteries will be furnished for each team. Therefore the model’s motor power leads must be readily accessible for easy attachment to a battery pack.
The Track
1. The race lane must be 60 cm wide and 20 m long. The track will be a hard flat surface, such as a tennis court or a smooth surfaced running track.
|
|
|
|
|
|
|
